
Connect your WordPress / WooCommerce store
Loop Voice works with WooCommerce through a small WordPress plugin. Once it's connected, Loop Voice gets your products, customers, orders, discount codes and abandoned checkouts in real time. Loop Voice can then call and text shoppers who abandon their checkout and track the revenue it recovers.
Setup takes about 10 minutes. You don't need to write code or set up webhooks yourself.
Before you start
Make sure you have:
- WordPress 6.2 or newer
- PHP 7.4 or newer (your host can tell you, or check Tools → Site Health → Info → Server)
- WooCommerce installed and active
- A WordPress login with Administrator or Shop Manager access
- Your store on HTTPS (a secure
https://address) - A Loop Voice account (free to create, see Step 1)
A Loop Voice workspace connects to one store. If you run several WooCommerce stores, create a separate Loop Voice workspace for each.
Step 1: Create your Loop Voice account
- Go to https://app.loopvoice.ai/signup and create an account with your business email.
- Follow the short onboarding to set up your workspace.
If you already have an account, sign in at https://app.loopvoice.ai.
Step 2: Download the plugin
Download the Loop Voice for WooCommerce plugin as a .zip file:
Download the Loop Voice plugin
Version 1.0.0 · ZIP · 60 KB
Don't unzip the file. WordPress needs the .zip file as it is.
Step 3: Install the plugin in WordPress
- Log in to your WordPress admin (usually
https://yourstore.com/wp-admin). - Go to Plugins → Add Plugin.
- Click Upload Plugin at the top of the page.
- Click Choose File and pick the
.zipfile you downloaded. - Click Install Now.
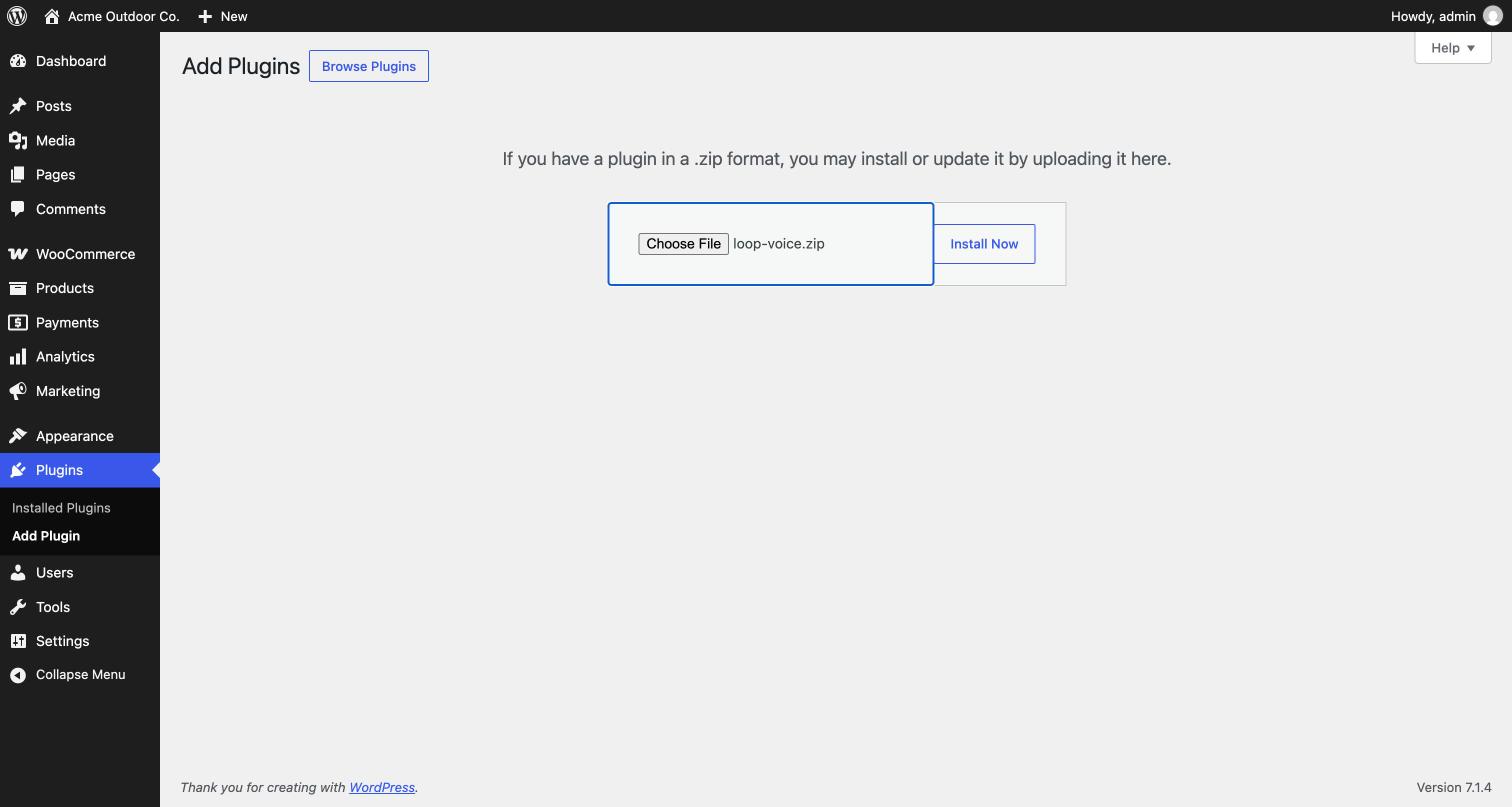
WordPress "Upload Plugin" screen with the Loop Voice zip selected - When it finishes, click Activate Plugin.
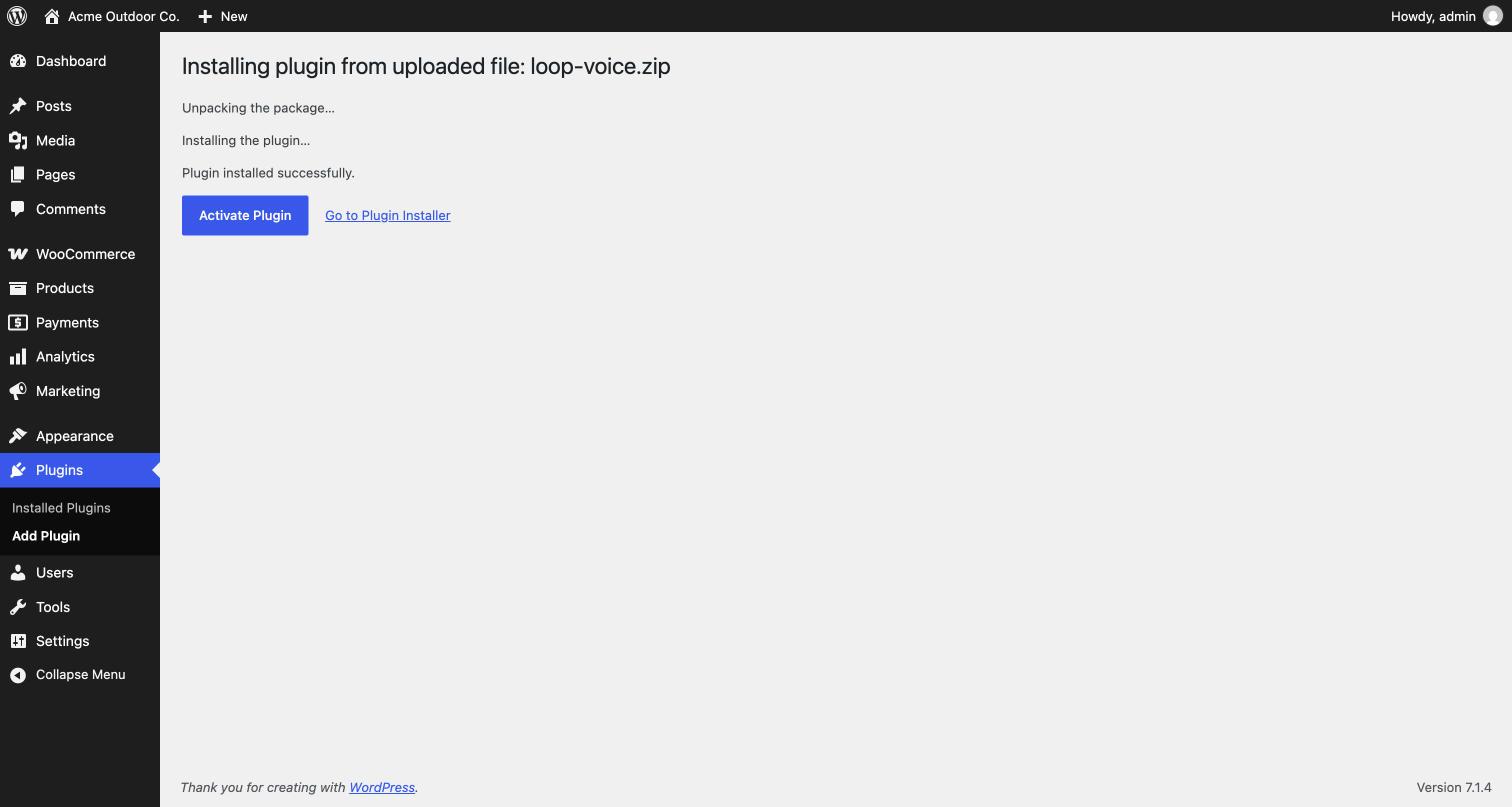
Plugin installed, ready to activate
The plugin adds a new menu item: WooCommerce → Loop Voice.
Step 4: Generate a connect token in Loop Voice
A connect token is a one-time code that links your WordPress site to your Loop Voice workspace.
- In Loop Voice, go to Settings → Integrations → WooCommerce.
- Click Generate connect token.
- Click Copy next to the token. It starts with
loopwc_.
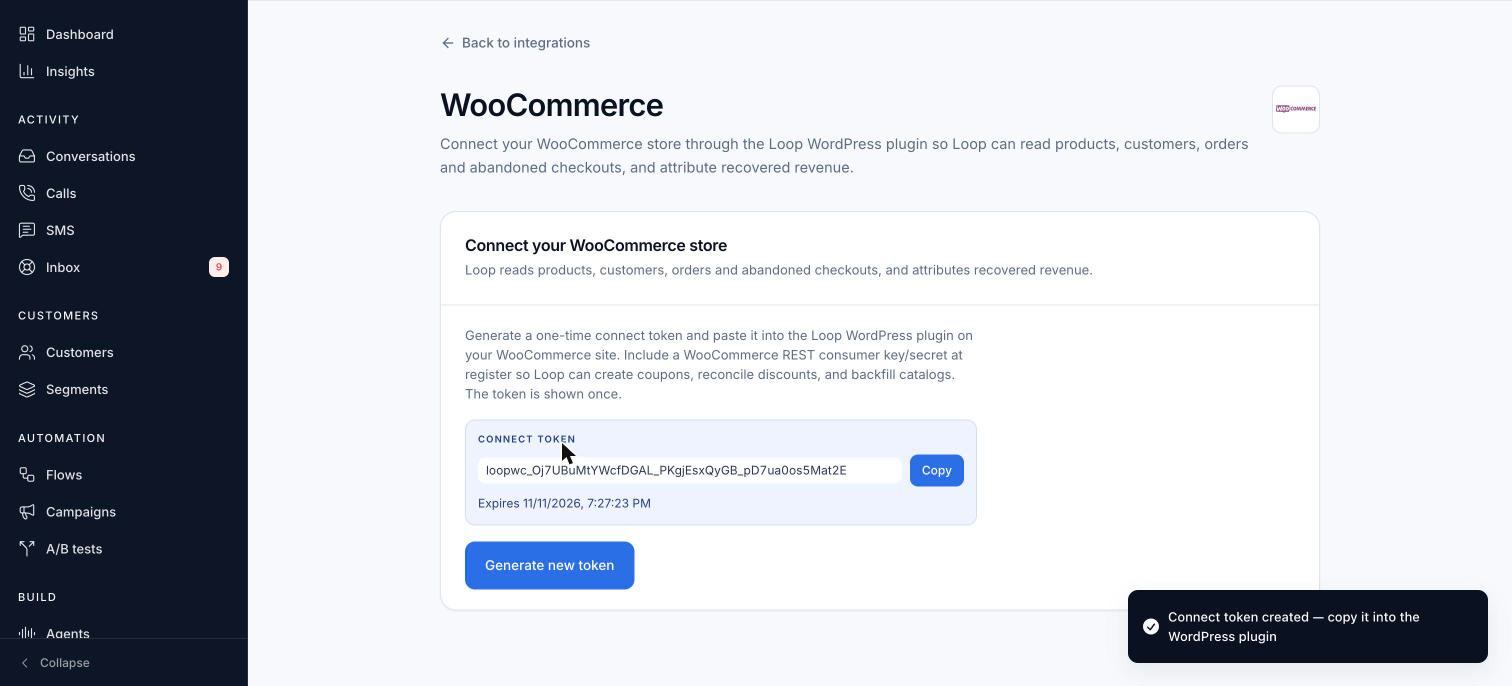
The token is shown only once. Keep this tab open until you've pasted it in Step 5.
A token expires after 7 days and works only once. If you click Generate new token, any earlier unused token stops working. Use the newest one.
Step 5: Connect the plugin
- In WordPress, go to WooCommerce → Loop Voice.
- Leave API base URL set to
https://api.loopvoice.ai. Don't change it. - Paste your token into the Connect token field.
- Leave Start catalog backfill after connect switched on. This sends your existing products, customers and discount codes to Loop Voice.
- Click Connect.
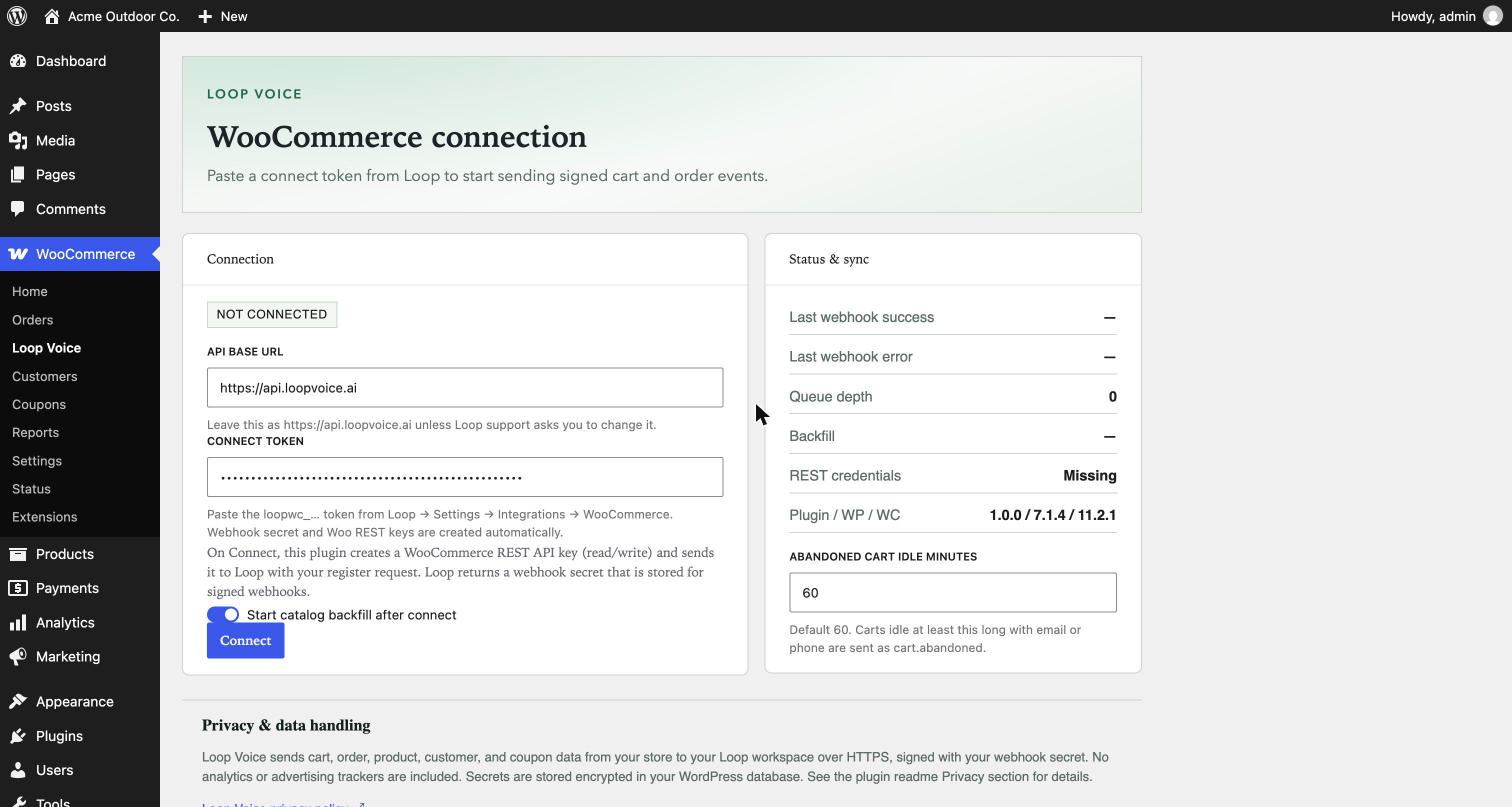
When you click Connect, the plugin automatically:
- creates a WooCommerce REST API key (read/write) and hands it to Loop Voice. Loop Voice uses it to create discount codes in your store and keep your catalog in sync.
- receives a secret key from Loop Voice and uses it to sign every event it sends, so Loop Voice knows the data really came from your store.
You don't need to create API keys or webhooks yourself.
Step 6: Check that the connection works
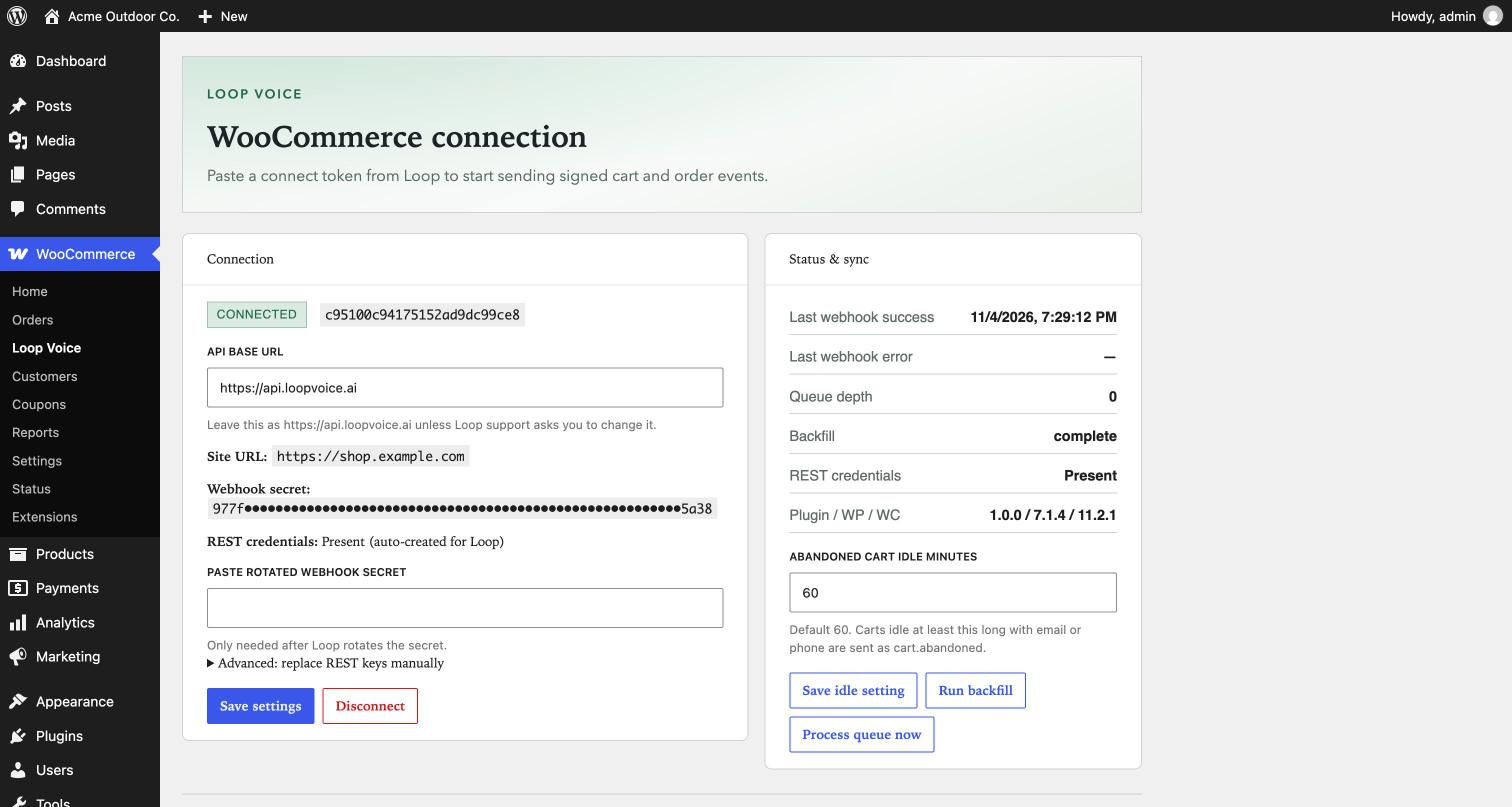
In WordPress (WooCommerce → Loop Voice):
- The status at the top of the Connection card says Connected.
- REST credentials says Present (auto-created for Loop).
- In the Status & sync card: Last webhook success shows a recent time once events start flowing; Backfill shows the progress of the catalog import; Queue depth shows how many events are waiting to be sent. It should drop toward 0.
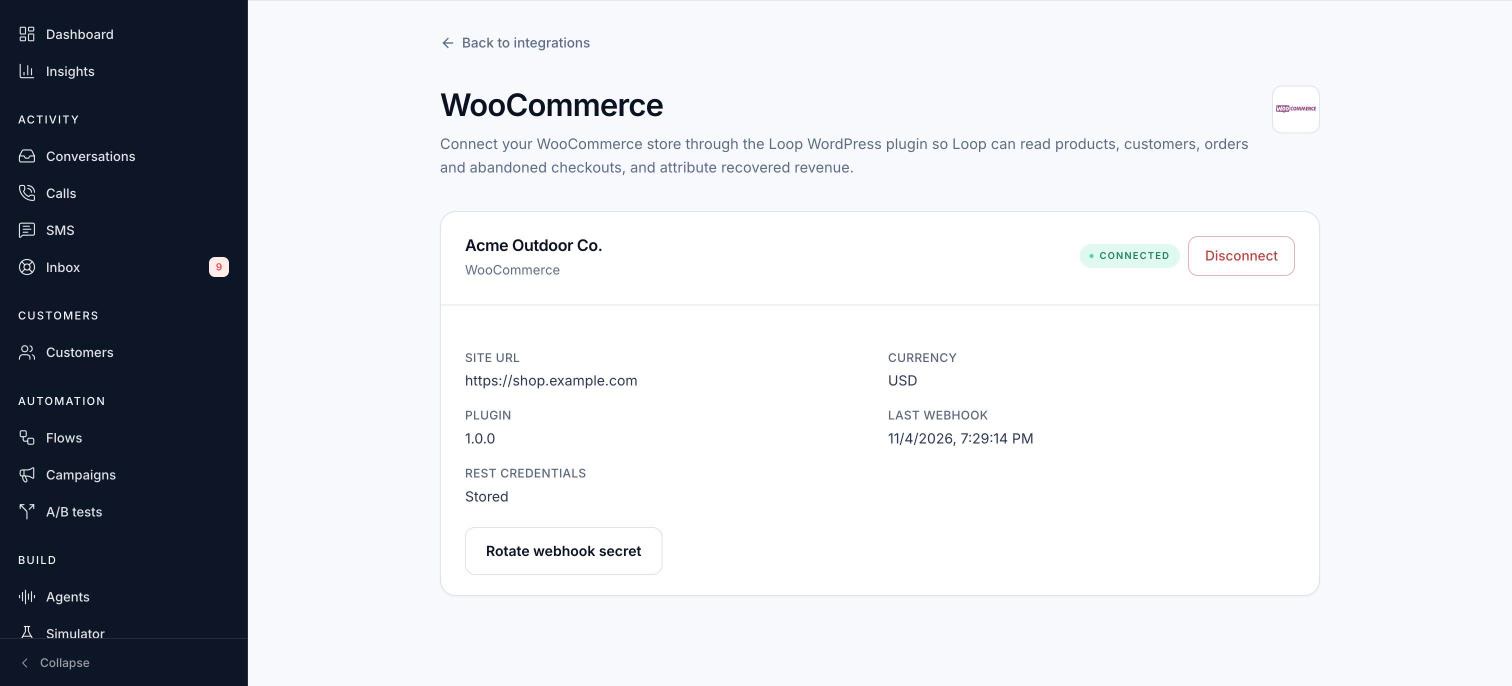
In Loop Voice (Settings → Integrations → WooCommerce):
- Your store shows as Connected, with your Site URL, Currency, Plugin version, Last webhook time, and REST credentials: Stored.
Large catalogs can take a while to import. You can keep setting up Loop Voice while the backfill runs.
Step 7: Choose when a cart counts as abandoned
In WooCommerce → Loop Voice → Status & sync, the Abandoned cart idle minutes setting controls how long a cart has to sit untouched before it's sent to Loop Voice as abandoned.
- The default is 60 minutes.
- Change the number and click Save idle setting.
A cart is only sent to Loop Voice once the shopper has entered an email or phone number at checkout. Loop Voice needs a phone number to call or text, so make sure your checkout asks for one. In WooCommerce, check Appearance → Customize → WooCommerce → Checkout (or your checkout block settings) and set the phone field to Required or Optional, not Hidden.
Step 8: Start recovering carts
Once your store is connected, finish setting up in Loop Voice:
- Get a phone number: pick the number Loop Voice calls and texts from.
- Set up your AI agent: choose the voice and review what it will say.
- Turn on an abandoned-checkout flow: this decides when Loop Voice calls and texts shoppers after they abandon their cart.
Loop Voice then tracks recovered orders, and you can see the revenue it brings back on your dashboard.
What data is shared with Loop Voice
The plugin sends only what Loop Voice needs to recover carts and track results, over a secure HTTPS connection:
| Data | What's included | Why |
|---|---|---|
| Abandoned carts | Items, totals, email/phone, billing/shipping details | So Loop Voice can call or text the shopper |
| Orders | Order number, status, totals, items, customer | To see when a cart is recovered and track revenue |
| Products | Products and variations | So the agent can talk about what's in the cart |
| Customers | Customer records | To recognise returning shoppers |
| Discount codes | Your WooCommerce coupons | So the agent can offer valid codes |
The plugin doesn't add tracking pixels, advertising IDs or browser fingerprinting, and it only talks to Loop Voice's servers.
Managing the connection
Rotate the secret key. If you rotate the webhook secret in Loop Voice (Settings → Integrations → WooCommerce), Loop Voice shows the new secret once. Paste it into Paste rotated webhook secret in the plugin and click Save settings. You don't need a new connect token.
Replace the REST API keys. If you deleted the auto-created key in WooCommerce, create a new one (WooCommerce → Settings → Advanced → REST API → Add key, permissions Read/Write). Then in the plugin open Advanced: replace REST keys manually, paste the consumer key and secret, and click Save settings.
Re-sync your catalog. Click Run backfill in the plugin to send all products, customers and discount codes again.
Disconnect. Click Disconnect in the plugin, or disconnect the store from the WooCommerce settings in Loop Voice. Loop Voice stops receiving events right away.
Uninstall. Deactivating and deleting the plugin removes its settings, queue and scheduled tasks from WordPress.
Troubleshooting
"Invalid or expired connect token"+
The token was already used, has expired (tokens last 7 days), or a newer token replaced it. In Loop Voice, click Generate new token, copy it, and paste it again.
"This WordPress site is already connected to a different Loop workspace"+
A site can only belong to one Loop Voice workspace. Disconnect it from the other workspace first, then connect again.
Loop Voice says another store is already connected+
Each workspace connects to one store. Disconnect the current store in Settings → Integrations, or create a new workspace for this store.
A WordPress notice says "Loop Voice webhook delivery is blocked"+
Your secret key no longer matches the one in Loop Voice. This usually happens after the secret is rotated. Paste the new secret into Paste rotated webhook secret and click Save settings, or click Disconnect and connect again with a new token.
"Queue depth" keeps growing, or "Last webhook success" doesn't update+
- Click Process queue now to send waiting events straight away.
- The plugin uses WordPress's scheduler (WP-Cron), which only runs when someone visits your site. On low-traffic sites, or if your host has turned WP-Cron off, ask your host to set up a real server cron job that calls
wp-cron.phpevery few minutes. - Check WooCommerce → Status → Scheduled Actions for failed
loop_voiceactions.
The Connect button fails, or settings won't save+
Security plugins, firewalls (such as Wordfence or Cloudflare rules) and some hosts block the WordPress REST API. Allow requests to /wp-json/loop-voice/ and /wp-json/wc/, and allow outgoing connections to api.loopvoice.ai. Then try again.
"REST credentials: Missing"+
Loop Voice can still receive carts and orders, but it can't create discount codes in your store or re-sync your catalog. Add keys by hand (see Replace the REST API keys above).
Abandoned carts aren't showing up in Loop Voice+
- Check the shopper entered an email or phone number at checkout.
- Wait at least the number of minutes in Abandoned cart idle minutes.
- Check Last webhook error in the plugin for a message.
Still stuck? Contact Loop Voice support from inside the app and include a screenshot of the plugin's Status & sync card.
FAQ
Will the plugin slow down my store?+
No. Events are queued and sent in the background, so pages and checkout aren't held up.
Does it work with my theme and checkout?+
It works with themes that use the standard WooCommerce cart and checkout. If you use a heavily customised or third-party checkout (for example a one-page checkout plugin), contact support before you go live so we can confirm carts are being captured.
Do I need a developer?+
No. If you can install a WordPress plugin, you can connect Loop Voice.
Can I connect a staging site first?+
Yes, but a site can belong to only one workspace. Use a separate Loop Voice workspace for staging so it doesn't clash with your live store.
What happens to my data if I disconnect?+
Loop Voice stops receiving new events right away. To have your store data deleted from Loop Voice, contact support.